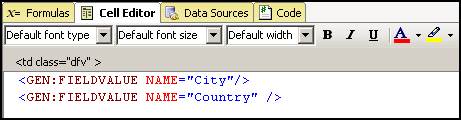
Use the Cell Editor to fine tune your page contents. Highlight any cell in the Page Layout Spreadsheet and look at the Cell Editor below to see the code generation tags and other content. You can add custom text and HTML as well as ASP.NET tags, JavaScript, or Flash within the Cell Editor. Combine multiple fields together, and lay them out just as you want them to look. Put <br> tags, non-breaking spaces ( ) or any other HTML command. Iron Speed Designer saves your custom cell content and passes it unchanged to your ASPX pages, except for code generation tags which Iron Speed Designer converts into ASP.NET controls. (Iron Speed Designer replaces code generation tags with ASP.NET controls in the page.)
Enter any text or other content you want:
|
Contents |
Example |
|
Text |
Dear <GEN:FieldValue Name=“FirstName”/>, |
|
HTML |
<font color="red"><GEN:FieldValue Name=“FirstName”/></font> |
|
<td> tags |
You can put a <td> tag around any code generation tag to customize any aspect of the table cell, and Iron Speed Designer will create the ASPX page with your <td> tags instead of its own. |
|
ASP.NET |
<asp:treeview id=“xxx” runat=“server”> |
|
JavaScript |
<img src="logo.gif" onmouseover="alert('Welcome to Iron Speed!')" /> |
|
Flash |
<object width="550" height="400"> <param name="movie" value="somefilename.swf"> <embed src="somefilename.swf" width="550" height="400"></embed> </object> |
The following examples illustrate how text, HTML and database field values can be combined.
|
Cell Editor contents |
Displays as |
Purpose |
|
<GEN:FieldValue Name="FirstName"/> |
William |
Displays the database field value. |
|
<font color=”red”><GEN:FieldValue Name="FirstName"/></font> |
William |
Displays the database field value in red. |
|
<a href=http://www.ironspeed.com/kb?q=<GEN:FieldValue Name="FirstName"/>> |
Search for William |
Displays a clickable URL (hyperlink) as part of a query string. |
You can easily add a data-driven email link where the email address is stored in a database field.
Step 1: Drag a Link Button control from the Toolbox onto the page.
Step 2: Configure the Link Button to send an email via the ‘Button actions’ property in the Property Sheet.
Do not manually enter (type) code generation tags (GEN: tags) into the Cell Editor. Instead, we recommend you drag controls from the Toolbox onto the Page Layout Spreadsheet rather than manually entering code generation tags in the Cell Editor. Then, add the appropriate HTML tags via the Cell Editor after dragging controls from the Toolbox onto your page. Dragging controls from the Toolbox ensures they are automatically (and properly) connected to the database. In contrast, manually entered (typed) code generation tags are not bound to your database, and the control won't know where or how to get data from the database, how to format and display the data, etc. You can configure code generation tags via the Property Sheet.
Do not modify Iron Speed Designer’s GEN: tags unless you’re an expert. Code generation tags instruct Iron Speed Designer which databound fields to create.
In particular, do not attempt to rename a control by editing the control’s name in the code generation tag. Iron Speed Designer will think you removed the control and create a new one for you! Instead, rename a control in the Page Layout Spreadsheet by first selecting the control and then select “Rename…” command in the right-click menu.
Iron Speed Designer places server controls tags in your application’s ASPX and ASCX files. The server-side functionality of the application is exposed to the ASPX pages as a set of XML tags. The ASP.NET control tags may also be used in pages and are passed through to the ASPX page.
The syntax of the ASP.NET control tags is very straightforward:
<NameSpace:TAGNAME
id="IDNAME"
runat="server"
...
>
</NameSpace:TAGNAME>
Example tags for various types of buttons:
|
Tag Type |
Example |
|
Standard HTML form submit button |
<input type="submit" id="b" ... /> |
|
Standard .NET HTML control |
<input type=”submit” id=”b” runat=”server” ... /> |
|
Standard .NET web control |
<asp:Button runat="server" id="b" ... /> |
|
Application base classes custom control |
<BaseClasses:Button runat="server" id="b" ... /> |
|
OMS application user control |
<OMS:Button runat="server" id="b" ... /> |
Note:
"ASP" is the tag prefix for the standard .NET web controls used in the ASPX pages.
"BaseClasses" is the tag prefix associated with the .NET custom controls defined in the application base classes.
The application’s name is used as the tag prefix for the application’s own.NET user controls (i.e. the ASCX controls). These tag prefixes are defined in each ASPX / ASCX file using the "<@Register ... >" statements near the top of the files.
The following allows you to embed any locally hosted Flash (SWF) file:
<object width="550" height="400">
<param name="movie" value="somefilename.swf">
<embed src="somefilename.swf" width="550" height="400"></embed>
</object>
The following embeds an Iron Speed Designer training video on YouTube:
<object width="480" height="385">
<param name="movie" value="http://www.youtube.com/v/LeK7-u-OLQE&hl=en_US&fs=1&"></param>
<param name="allowFullScreen" value="true"></param>
<param name="allowscriptaccess" value="always"></param>
<embed src="http://www.youtube.com/v/LeK7-u-OLQE&hl=en_US&fs=1&"
type="application/x-shockwave-flash"
allowscriptaccess="always"
allowfullscreen="true"
width="480"
height="385"></embed>
</object>
Example: Adding Third-Party Controls to a Page
Example: Adding Custom ASCX Controls
Navigating Your Application in Design Mode
Using the Page Layout Spreadsheet and Toolbox
Customizing Page Contents with the Cell Editor
Configuring Cell, Row and Table Styles
Placing ASP.NET Directives in Application Pages
Using Frames in Application Pages